
How to Make a DIY Dry Erase Board for Just $20

When I went online shopping for a 4×8 dry erase board, I found prices ranging from $250 all the way up to $500. That’s when I decided there had to be a better way—and I found it.
Turns out, you can build your own DIY dry erase board for about $20 using materials from your local home improvement store. The best part? It looks and works exactly like those expensive boards, but you’ll save hundreds of dollars. Let me walk you through exactly how I did it, step by step.
What You’ll Need for Your DIY Dry Erase Board
Before heading to the store, here’s your shopping list:
- 1 sheet of 4×8 white hardboard. I made mine at this size, but if you need a different size board, you can purchase the dimensions that work for your space.
- 3 pieces of 8-foot white end caps . See price on Amazon
- 8-inch mirror mount brackets . See price on Amazon
- Elmer’s glue. See price on Amazon
- Double-sided adhesive squares. See price on Amazon
- Screws (recessed head type work best). See price on Amazon
- Drill. See price on Amazon
Total cost: Around $20-25

Step 1: Get Your Main Board Material
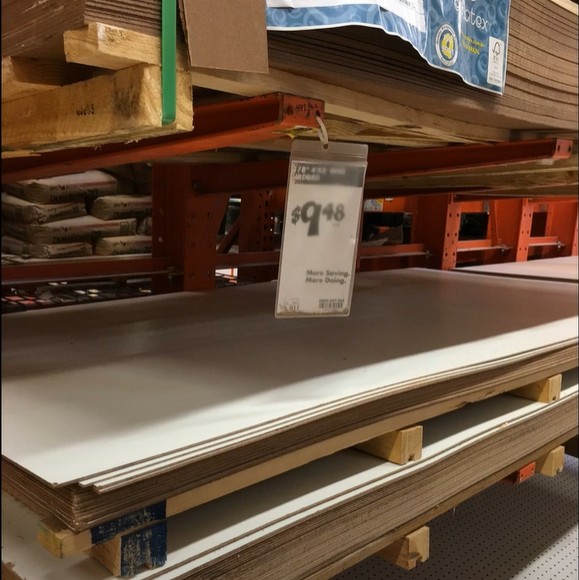
Head to Home Depot first and grab a lumber cart. The secret ingredient for this DIY dry erase board project is something called white hardboard. It’s an 8-inch 4×8 sheet that looks exactly like the surface of those expensive dry erase boards.
You’ll find this in the lumber section, usually hanging with other sheet materials. The price should be around $9.48 per sheet, though it varies slightly by location.
Step 2: Shop for the Finishing Materials
Pick up three 8-foot white end cap pieces. These vinyl trim pieces will cover the raw edges of your hardboard and give it that professional, finished look. At about $1 each, they’re a bargain for the polished appearance they provide.

While you’re there, grab the 8-inch mirror mount brackets. These are perfect because they have slots that let you hide the screw heads, making for a cleaner installation.

Step 3: Cut the End Caps to Size
Here’s where you’ll need to do a little measuring and cutting. Your 4×8 board needs trim on all four sides:
- Cut one 8-foot end cap in half to create two 4-foot pieces for the sides
- Keep the other two 8-foot sections full length for the top and bottom

Step 4: Attach the End Caps
This step gives your DIY dry erase board that finished, professional edge. The end caps have a channel that slides right over the edge of the hardboard.
Before you snap them on, run a thin line of Elmer’s glue inside the channel. This keeps everything secure and prevents the caps from sliding around over time. Work your way around all four edges, making sure each piece fits snugly.

The white end caps cover up the raw, slightly scuffed edges of the hardboard, so your board looks store-bought instead of homemade.

Step 5: Install the Mirror Mount Brackets
The 8-inch mirror mounts are genius for this project. They’re exactly the right size for your board’s thickness, and those slotted holes make positioning easy.

Install brackets along the top edge of your board, making sure the slots are oriented to support the weight properly. Space them evenly—I recommend one on each end and one or two in the middle, depending on your wall and how much support you want.
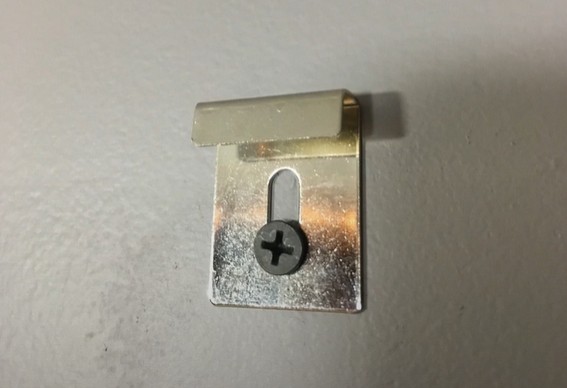
Use recessed head screws instead of regular machine screws. The recessed heads sit flush and won’t interfere with writing on the board.
Step 6: Mount Your Board to the Wall
Once your DIY dry erase board is assembled, it’s time to hang it.
Mark where your brackets will attach to the wall, making sure everything is level. Install the board using appropriate wall anchors for your wall type (drywall anchors, studs, etc.).
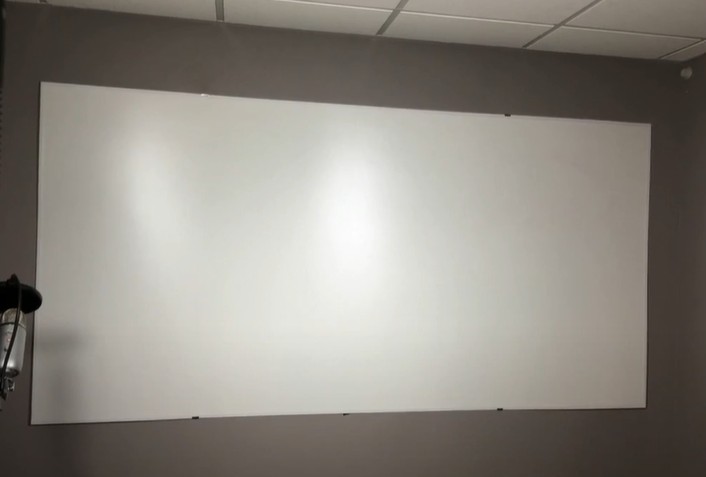
Here’s a helpful tip: After you’ve got the board hanging, place a small double-sided adhesive square in each corner. This prevents the board from shifting or tilting when you’re writing on it, but it’s still removable if you ever want to take it down.
Why This DIY Dry Erase Board Works So Well
The white hardboard material is the same stuff used in commercial dry erase boards. It has a smooth, non-porous surface that dry erase markers glide across beautifully, and it wipes clean with a standard eraser or cloth.
I use mine for teaching online business tutorials, and it’s held up perfectly. Whether you need it for lesson planning, kids’ art projects, family calendars, or brainstorming sessions, this budget-friendly board handles it all.
That’s hundreds of dollars back in your pocket for the exact same functionality.
Alternative Sizes and Variations
Don’t need a full 4×8 board? The white hardboard comes in smaller sizes too, or you can have the store cut your sheet to custom dimensions. The same process works for any size:
- 2×4 for a home office desk area
- 3×4 for a kids’ room
- 4×4 for a square calendar board
- 2×8 for a narrow wall space
Just adjust your end cap measurements accordingly, and you’re good to go.
Tips for Success
Ask for help at the store: Those hardboard sheets are heavy and awkward. Don’t be shy about asking for assistance loading it onto your cart and into your vehicle.
Make clean cuts: If you’re cutting the end caps yourself, use a sharp saw and measure twice. Clean cuts mean better-fitting trim pieces.
Check your wall: Make sure your wall can support the weight. A 4×8 board isn’t terribly heavy, but you want secure mounting, especially if kids will be using it.
Consider your space: A 4×8 board is large. Measure your wall space before you shop to make sure it fits where you want it.
Keep markers nearby: Mount a small basket or magnetic holder next to your board for markers and erasers so they’re always within reach.


